This post is the first post of two part series about serverless functions in Oracle Cloud Infrastructure, why they appear to be popular, how they're invoked in OCI and finally, a use case on how to build a serverless function to automate the backups of an EPM Cloud application.
Let's start by what is an Oracle Function as defined by Oracle:
“Oracle Functions is a fully managed, multi-tenant, highly scalable, on-demand, Functions-as-a-Service platform. It is built on enterprise-grade Oracle Cloud Infrastructure and powered by the Fn Project open source engine.
The serverless and elastic architecture of Oracle Functions means there's no infrastructure administration or software administration for you to perform. You don't provision or maintain compute instances, and operating system software patches and upgrades are applied automatically.”
To simplify it further, think of functions as single-purpose programs that can run anywhere and do not require dedicated infrastructure resources like compute instances, block volumes for storage etc. You can find more information here.
Why are they popular? I won’t go delve into the never ending debate on which is approach is better, monolithic vs microservices vs functions-based application architecture, there are pros and cons for each approach and I believe they all will coexist together because there is no one size fits all architecture for all applications.
For me, serverless functions are appealing because they don’t require dedicated infrastructure resources to setup, they can be programmed in many languages (Python, Java, Go, Node and Ruby), they can be invoked in many ways and you only pay for resources used while the function is running, not idle.
Serverless backups
Typically, the standard approach for designing EPM application backups , or any other system for that matter, relies on having a dedicated server running in a customer-managed data centre or the cloud to configure the backup automation scripts, install required tools such as EPM Automate and schedule jobs etc.
So, how do we go serverless using Oracle Functions?
In the following example, I will demonstrate how to design a cloud-native backup solution for an EPM Cloud application using Oracle Functions.
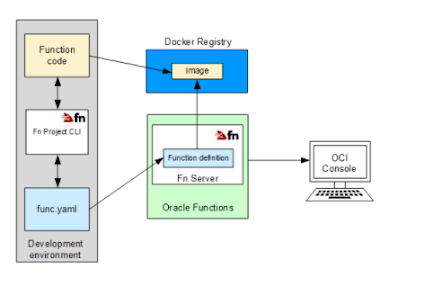
The process of creating, deploying and invoking functions is summarised in the following diagrams taken from Oracle documentation (if you are not familiar with Docker containers, you can read more about it here.)
- Create container image with the function code and yaml file
- Deploy and push the image to your container registry
- Invoke the function using any of the available methods (I will cover two methods in this post, and the other available methods in a subsequent post)
Deploy functions
Invoke functions
Let's start developing the function. In OCI, you can build create and deploy Docker images in three ways:
1. Cloud Shell
2. Local machine
3. OCI Compute Instance
In this post, I will be using Cloud Shell for the following reasons:
1. It is easy to start with (no need to install and configure Docker)
2. OCI CLI is installed and preconfigured
3. Python is preinstalled (I only need it for testing my code before deploying the function to the container)
It is also recommended to create a compartment so you can do your development in one compartment, I have also created a container repository to push the Docker images to, an application for the function, an object storage bucket to store the backup files and a vault to store EPM and user token secrets needed for authentication.
The first step is to create a Docker image template and to do this, we need to login to the OCI console, launch Cloud Shell, and create the Docker image using the following command
fn init --runtime python3.8 serverless-backups
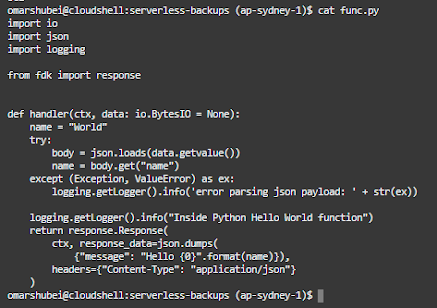
As shown in the following screenshot, this command will create a "hello-world" Python 3.8 Docker base image for a function called serverless-backups, requirements.txt file for packages and yaml config file.
The second step is to add the Python code for my function, and add OCI package in requirements.txt (By default, oci is not included in the image and we need this particular package to access vaults APIs).
Using vim editor, I will update the code with my new Python function.
Here is the code in snippet format:
1 2 3 4 5 6 7 8 9 10 11 12 13 14 15 16 17 18 19 20 21 22 23 24 25 26 27 28 29 30 31 32 33 34 35 36 37 38 39 40 41 42 43 44 45 46 47 | import io import json import logging import oci import http.client import base64 from fdk import response from datetime import datetime #Get secret content function in base64 def get_secret_base64(secret_id): signer = oci.auth.signers.get_resource_principals_signer() try: client = oci.secrets.SecretsClient({}, signer=signer) secret_content = client.get_secret_bundle(secret_id).data.secret_bundle_content.content except Exception as ex: print("Error getting secret contents", ex, flush=True) raise return secret_content #Main function def handler(ctx, data: io.BytesIO = None): cfg = ctx.Config() epmURL = cfg["epmURL"] osURL = cfg["osURL"] sec1_ocid = cfg["epm_secret"] sec2_ocid = cfg["token_secret"] #Get EPM credentials and auth toen for object storage epm_login_secret = get_secret_base64(sec1_ocid) object_storage_token = get_secret_base64(sec2_ocid) #Backup details backup_time = datetime.now().strftime("%Y_%m_%d-%I:%M:%S_%p") os_pwd = base64.b64decode(object_storage_token.encode('utf-8')).decode('utf-8') os_url = osURL+backup_time+".zip" os_user = "epm_cloud_test_user" os_snapshot = "Artifact Snapshot" conn = http.client.HTTPSConnection(epmURL) payload = "url="+os_url+"&username="+os_user+"&password="+os_pwd+"&filepath="+os_snapshot headers = { 'Content-Type': 'application/x-www-form-urlencoded', 'Authorization': 'Basic {}'.format(epm_login_secret) } conn.request("POST", "/interop/rest/v1/services/copytoobjectstore", payload, headers) data = conn.getresponse().read() return response.Response(ctx, response_data=data) |
get_secret_base64 is a function that will return the content of Vault secrets in Base64 (here is an excellent blog by the A-Team on working with vaults in Python).
Handler section is considered the main function and is the entry point for the function (similar to Java's public static void main(string args)).
The following section is where I'm calling the get_secret_base64 function and passing the secrets' OCID to get the EPM credentials and Object Storage tokens contents in base64. (OCID and URL information is stored in configuration key pairs defined at the function level)
1 2 3 4 5 6 7 8 | cfg = ctx.Config( epmURL = cfg["epmURL"] osURL = cfg["osURL"] sec1_ocid = cfg["epm_secret"] sec2_ocid = cfg["token_secret"] #Get EPM credentials and auth toen for object storage epm_login_secret = get_secret_base64(sec1_ocid) object_storage_token = get_secret_base64(sec2_ocid)) |
In the next line, I'm decoding the authentication password for Object Storage to plaintext so I can use in CopyToObjectStorage REST API.
os_pwd = base64.b64decode(object_storage_token.encode('utf-8')).decode('utf-8')
Finally, I'm calling EPM Cloud's CopyToObjectStorage API to copy the Artifact Snapshot backup file to an Object Storage bucket called serverless-backups.
1 2 3 4 5 6 7 8 9 10 11 12 13 14 | backup_time = datetime.now().strftime("%Y_%m_%d-%I:%M:%S_%p") os_pwd = base64.b64decode(object_storage_token.encode('utf-8')).decode('utf-8') os_url = osURL+backup_time+".zip" os_user = "epm_cloud_test_user" os_snapshot = "Artifact Snapshot" conn = http.client.HTTPSConnection(epmURL) payload = "url="+os_url+"&username="+os_user+"&password="+os_pwd+"&filepath="+os_snapshot headers = { 'Content-Type': 'application/x-www-form-urlencoded', 'Authorization': 'Basic {}'.format(epm_login_secret) } conn.request("POST", "/interop/rest/v1/services/copytoobjectstore", payload, headers) data = conn.getresponse().read() return response.Response(ctx, response_data=data) |
Now it is time to deploy the function to the registry using the following command.
fn deploy --app serverless-backups
Once complete, you will "Successfully created function:...." as shown here.
To list the Docker images, I can run "Docker images".
Now we have the function deployed, we can review the image details that has been pushed using OCI CLI or by using Console. For example, here is the registry I just deployed the function to:
The deployed function (notice the invoke endpoint which will be used to invoke the function using raw-request CLI command next).
Last but not least, let us invoke this function using two methods: "fn invoke" and oci's "raw-request" cli command.
In Cloud Shell, invoke the fn function using the following command
fn invoke serverless-backups serverless-backups
Notice the function ran successfully and returned a JSON response.
I can verify a new backup has been copied to the bucket.
I can also invoke the function using raw-request cli command as follows (you need the invoke endpoint for the function which is shown in the previous function screenshot):
oci raw-request --http-method POST --target-uri
Another backup file has been copied to the bucket.
That is it for this post, I've just demonstrated how to build a serverless function that copies the latest EPM Cloud backup file to an object storage bucket in OCI using Oracle Functions.
In subsequent posts, I will expand on this and go through other ways we can invoke functions using Events, Alarms and OIC to further demonstrate how "serverless" functions can be embedded and used in the overall OCI ecosystem.
Thank you for reading.
