Sunday, September 16, 2018

New EPM cloud users with SSO - Quick Tip

Have you ever tried to create an EPM cloud user (PBCS, PCMCS, EPRCS..)...and you were expecting a temporary password in the email notification but it was nowhere to be found? I know It can be a bit confusing, you're quite certain you've created the user but at the same time you cannot log in because you don't have your password /security questions setup for the first time.

This is a sample email notification notifying you've been granted access to the EPM instance, as you can see there is just a direct link to the login page but no temporary password.


 This is a sample email notification with a temporary password.


Well, this is happening because of Single Sign-On configuration is on, which means you must select the "Maintain Identity Domain Credentials" when you create the new user if the user is not part of the Identify Provider domain.


That's it, quick and easy! 

Hope this helps.


Friday, July 27, 2018

E-PBCS Tricks - Navigation Flows

We all love Navigation Flows,,don't we? Sometimes we have to deal with a number of Navigation Flows per user role (Planners,,,Super Users,,etc) and if you don't take a sound design approach you may end up with a lot of repetitive and manual work to maintain them.

In this post I'll show a simple and efficient way to handle multiple Navigation Flows and Data Forms. I'll start with my data forms. I have three data forms I want to group in a Card for ease of access.


This Card is going to be visible to both Planners and Super users. It's a simple Card as shown here.


I'm going to create a Global Navigation Flow which will act as my source Navigation Flow. I've created the card "Actual vs Plan" in Global, as you can see it's "Inactive" but that is not going to be a problem.


I also have the two main Navigation Flows (Planners and Super Users) and both are having the card "Actual vs Plan" Card as a local Existing object referencing Global Navigation Flow.


So, If I switch to a "Super User" Navigation Flow I'll get to see the card.


Same applies to "Planners" Navigation Flow.


So far so good,, it's straight forward and simple. Here comes the beautiful part, what if you have a lot of changes to the Card (re-ordering forms, adding new forms  etc)... good thing is that you don't need to go to every Navigation Flow and update the Card, you just update the master Card in "Global" and updates will be rolled-out to the flows.

So if we want to add a new tab/form "IT", simply go to "Global" Navigation Flow and update the Card.


We just need to "Reload Navigation Flow" and that's it.


Users can see the new tab.


Voila, that's it!

In this example I just showed a Card with three forms and two Navigation Flows, in reality you might have a lot more than that, so this is certainty a great way to manage your Navigation Flows.


Thursday, March 1, 2018

Metadata tricks using Groovy in EPBCS


I have been very busy the past couple of months. New job, new projects, frequent travelling, and a lot of running in preparation for my next race in TWO weeks in Katoomba in the Blue Mountains. I'm running Six Foot Track, Australia's most famous trail run and one of the toughest, a 45km trail run with 1600 meter of elevation change. Wish me luck!

This post is about using Groovy in metadata management in EPBCS. In my example I will be showing a very simple model built for a Project Planning application that mainly involves:

  1. Approving New Projects
  2. Automatically assigning Project Codes to the approved projects based on the existing sequence
  3. Assign and move the Approved Project to another hierarchy hierarchy (Construction, IT, Business, Service..)

Let me start by showing my Project dimension outline.


So I have four Porject categories:

  1. Construction
  2. IT
  3. Business
  4. Services

Approved Projects are prefixed with P_ and have four digits number. Moving on to "Project Approvals" card where I will be handling the New and Approved Projects.


Vertically tabbed card showing New and Approved projects .The form shows all of the New Project requests that needs to be approved or rejected sitting in the first tab. At this stage I'm simply capturing the description and the total Budget for the sake of simplicity. Notice the information is captured at "No Entity" intersection.


In the second tab I have the Approved Projects with more information like Status, Approver, Comments. I'm also intersecting the Approved Projects with the relevant Entity (Will come back to this when I talk about the business rule).


So now I want to approve "New_Project_006" and see what happens. I have attached my main business rule to a Menu and I'll simply right-click on the Project and launch the "Approve" rule.


I have three rtps to enter:

  1.  Comments (with simple validation to make sure there are at least n number of characters entered)
  2. Parent Project to move the newly approved project under
  3. Department (Entity) to select the relevant department for the approved project


I'm restricting the Parent rtp to the children of "Total Approved" as shown below.


I'm also selecting a department from a hierarchy-driven SmartList.


If you want to learn more about hierarchy driven SmartList you must read Celvin's posts, and Pete's post.


As you can see in the screenshot above, I have provided a comment, selected "Construction" as a parent for the approved project, Finance as my department, and will launch the business rule.


My new project was approved and is no longer shown in the New Projects tab. I'll go to Approved Projects to see what happened. There is a new member "P_1005" intersected with Finance entity with project information and approval details. 


The Approved Projects outline now looks like:


Illustration of what just happened:


Nice huh? You betcha!!


Back to my New Projects form, I'll try and approve another project and see if the rtp comments validation works.


"Yeha approved" is my comment for approval and it's not going to cut it as shown below!.


Sorry, never again Groovy! I'm going to behave from now on.

Now my project is approved (after putting proper comments) and assigning it to IT category and Finance department.


My Approved Projects (notice the new project P_1006).


My Project dimension outline.


And that's it really. Powerful stuff if you ask me, the sky is the limit with Groovy (quite literally).

Main business rule.


 1 
 2
 3
 4
 5
 6
 7
 8
 9
10
11
12
13
14
15
16
17
18
19
20
21
22
23
24
25
26
27
28
29
30
31
32
33
34
35
36
37
38
/*RTPS: {Project} {Year} {Scenario} {Version} {Approver} {Comments} {Department} {ProjectParent}*/
def mbUs = messageBundle(["validation.invalidComment":"You must have at least 15 characters in comments rtp. {0}"])
def mbl = messageBundleLoader(["en" : mbUs]);
validateRtp(rtps.Comments, /^.{15,}$/, mbl, "validation.invalidComment", rtps.Comments);
Dimension project = operation.application.getDimension("Project")
def existingProjects = project.getEvaluatedMembers("ILvl0Descendants(Total Approved)", operation.cube )
existingProjects.sort()
def lastApprovedProject = existingProjects
String lastApprovedProjectCode = lastApprovedProject.last()
int i = lastApprovedProjectCode.find(/\d+/).toInteger()
i++
String newApprovedProject = "P_"+i
Member parentProject = rtps.ProjectParent.getMember()
Map approvedProject = parentProject.newChildAsMap(newApprovedProject)
// Save the new approved ptoject
Member approvedProjectMember = project.saveMember(approvedProject, DynamicChildStrategy.ALWAYS_DYNAMIC)
println rtps.Project.toString() + " is approved. New approved code is " + newApprovedProject
// Copy data to the new project member
String script = """Set CreatenonMissingBlk On;
Fix(${fixValues(rtps.Scenario, rtps.Year, rtps.Version)})
Fix(${fixValues(approvedProjectMember)},@Member(@Concatenate("HSP_ID_",@HspNumToString({Department}))))
"BegBalance"
(
"Project Description" = "Project Description"->"No Entity"->$rtps.Project;
"Project Status" = 1;
"Approved By" = $rtps.Approver;
"Project Total Budget" = "Project Total Budget"->"No Entity"->$rtps.Project;
"Project Approval Date" = @CalcMgrGetCurrentDate();
"Comments" = $rtps.Comments;
)
EndFix
Fix(${fixValues(rtps.Project)},"No Entity")
ClearBlock All;
EndFix
EndFix
"""
println script
return script.toString()


I'll explain the important bits in the rule (read my earlier posts for more explanation).

Validating the comments rtp.


validateRtp(rtps.Comments, /^.{15,}$/, mbl, "validation.invalidComment", rtps.Comments);


Working out the new approved project code.


Dimension project = operation.application.getDimension("Project")
def existingProjects = project.getEvaluatedMembers("ILvl0Descendants(Total Approved)", operation.cube )
existingProjects.sort()
def lastApprovedProject = existingProjects
String lastApprovedProjectCode = lastApprovedProject.last()
int i = lastApprovedProjectCode.find(/\d+/).toInteger()
i++
String newApprovedProject = "P_"+i


Copy the data to the new approved project member, capture the Project Description, Status, Approver (using StringAsNumber Cal Manager variable), Total Budget, Approval date, and the Comments (using StringAsNumber Calc Manager variable).


String script = """Set CreatenonMissingBlk On;
Fix(${fixValues(rtps.Scenario, rtps.Year, rtps.Version)})
Fix(${fixValues(approvedProjectMember)},@Member(@Concatenate("HSP_ID_",@HspNumToString({Department}))))
"BegBalance"
(
"Project Description" = "Project Description"->"No Entity"->$rtps.Project;
"Project Status" = 1;
"Approved By" = $rtps.Approver;
"Project Total Budget" = "Project Total Budget"->"No Entity"->$rtps.Project;
"Project Approval Date" = @CalcMgrGetCurrentDate();
"Comments" = $rtps.Comments;
)
EndFix
Fix(${fixValues(rtps.Project)},"No Entity")
ClearBlock All;
EndFix
EndFix
"""
println script
return script.toString()


The script above is really simple, only thing worthy of mention is me using the Entity dimension hierarchy driven SmartList to move the data from "No Entity" to the user selected entity. Again you can read Pete's detailed post to understand more.


This is the business rule log.


So to recap, Groovy is pretty awesome! it offers a lot of different and powerful design options. My example is pretty straight-forward but you can easily build more complex scenarios and take it from there.


Wish Me Luck in Six Foot track💪🙏😎

Wednesday, January 31, 2018

Essbase Cloud and Data Visualization


I want to show how easy it is to create dashboards with Oracle Analytic Cloud Data Visualization and with Essbase Cloud as data source.

First I will create a new Essbase application from the scratch (manually).


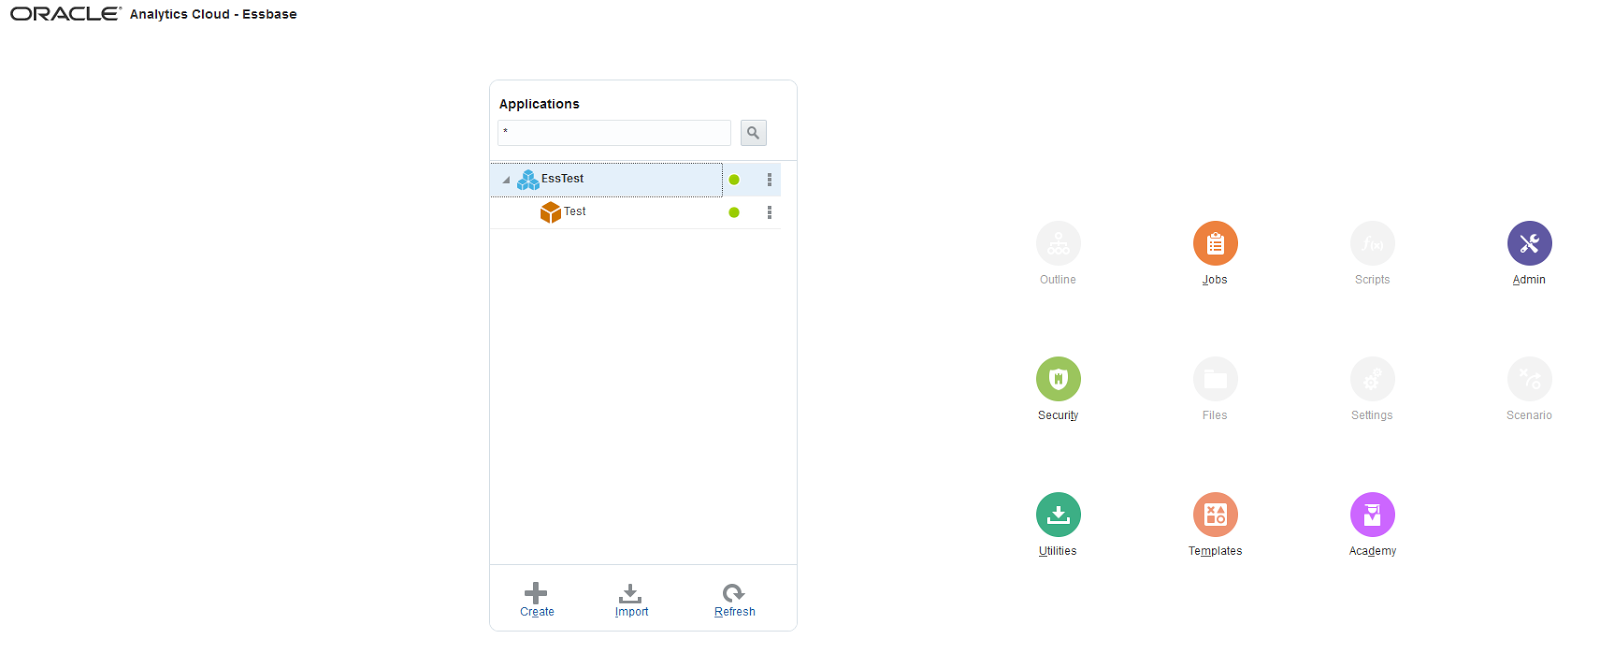
My skeleton application


And now I'll create a very simple outline so I can load some data in the cube.


It's  very easy to do this (almost as easy as the old days), simply click on "Lock and Edit" and start creating Dimensions/Members. So here is my application's outline.


I created five dimensions (Account, Scenario, Years, Version, and Country) with one or two members in each.

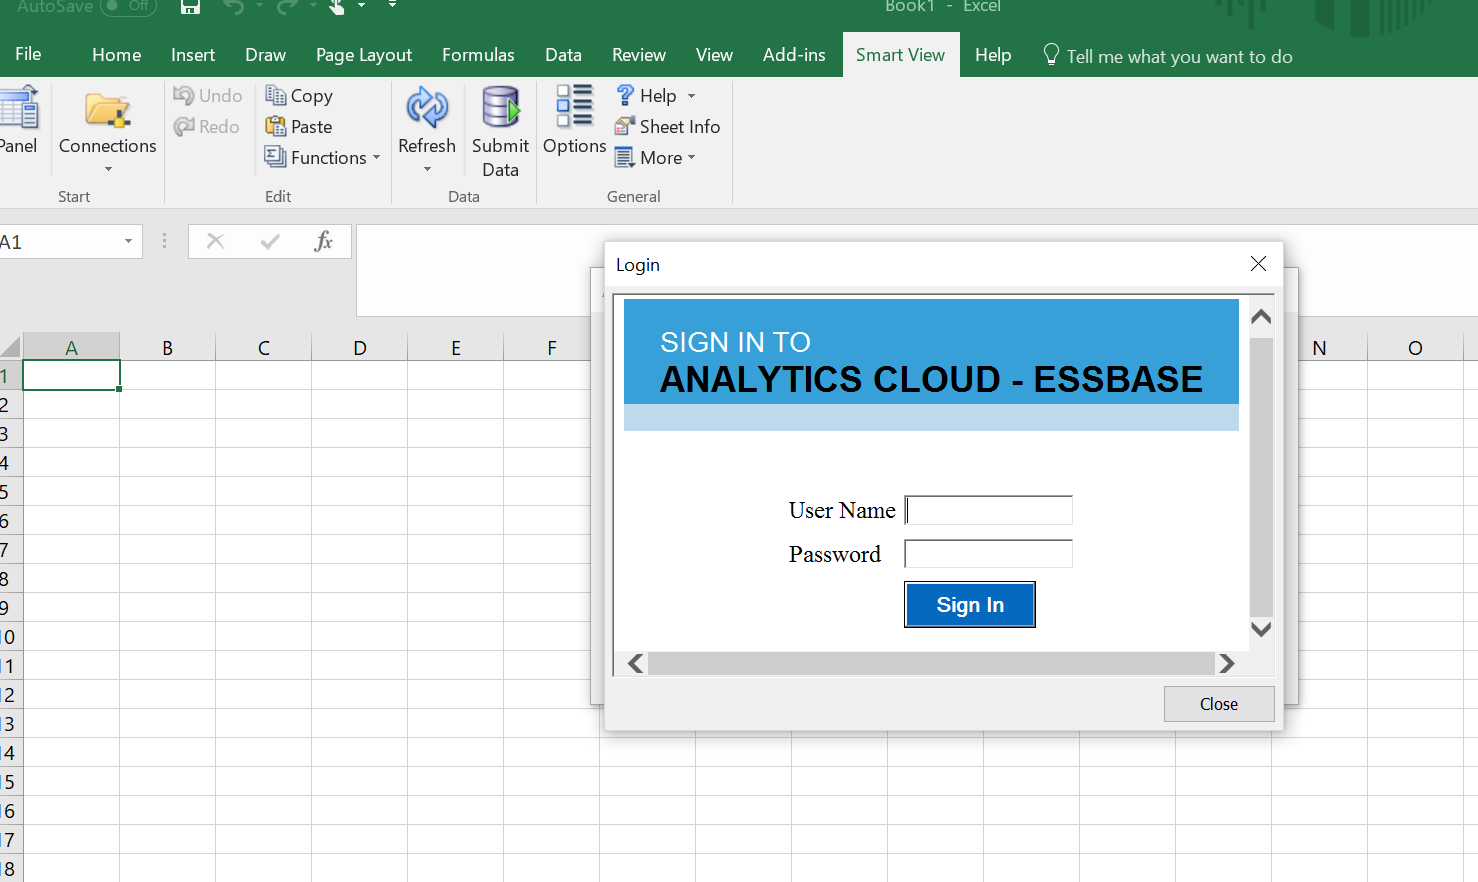
Now I'll connect to the cube from SmartView (Essbase Cloud connection).


Select the application and database (just like connecting to on-premise Essbase application)


Locking/Sending some data.


Now I have created a simple application with some data, I want to see how easy it is to use Data Visualization and access my Essbase cube. This is the OAC landing page.


Before I start working on the report I want to create my data source (it's similar to Tableau but in my humble opinion a lot easier to work with and more intuitive). So I'll start by clicking on Data Sources.


And create New EssCS Data Source.


And select the Essbase application and database you want to connect to.


And the connection is now ready and accessible via the Databases tab.


Now we have the connection ready, let's create the report. From the newly created Database connection, I'll create a new project. (Create Project will create Data Visualization report and Create Analysis will create Oracle BI Answers report).


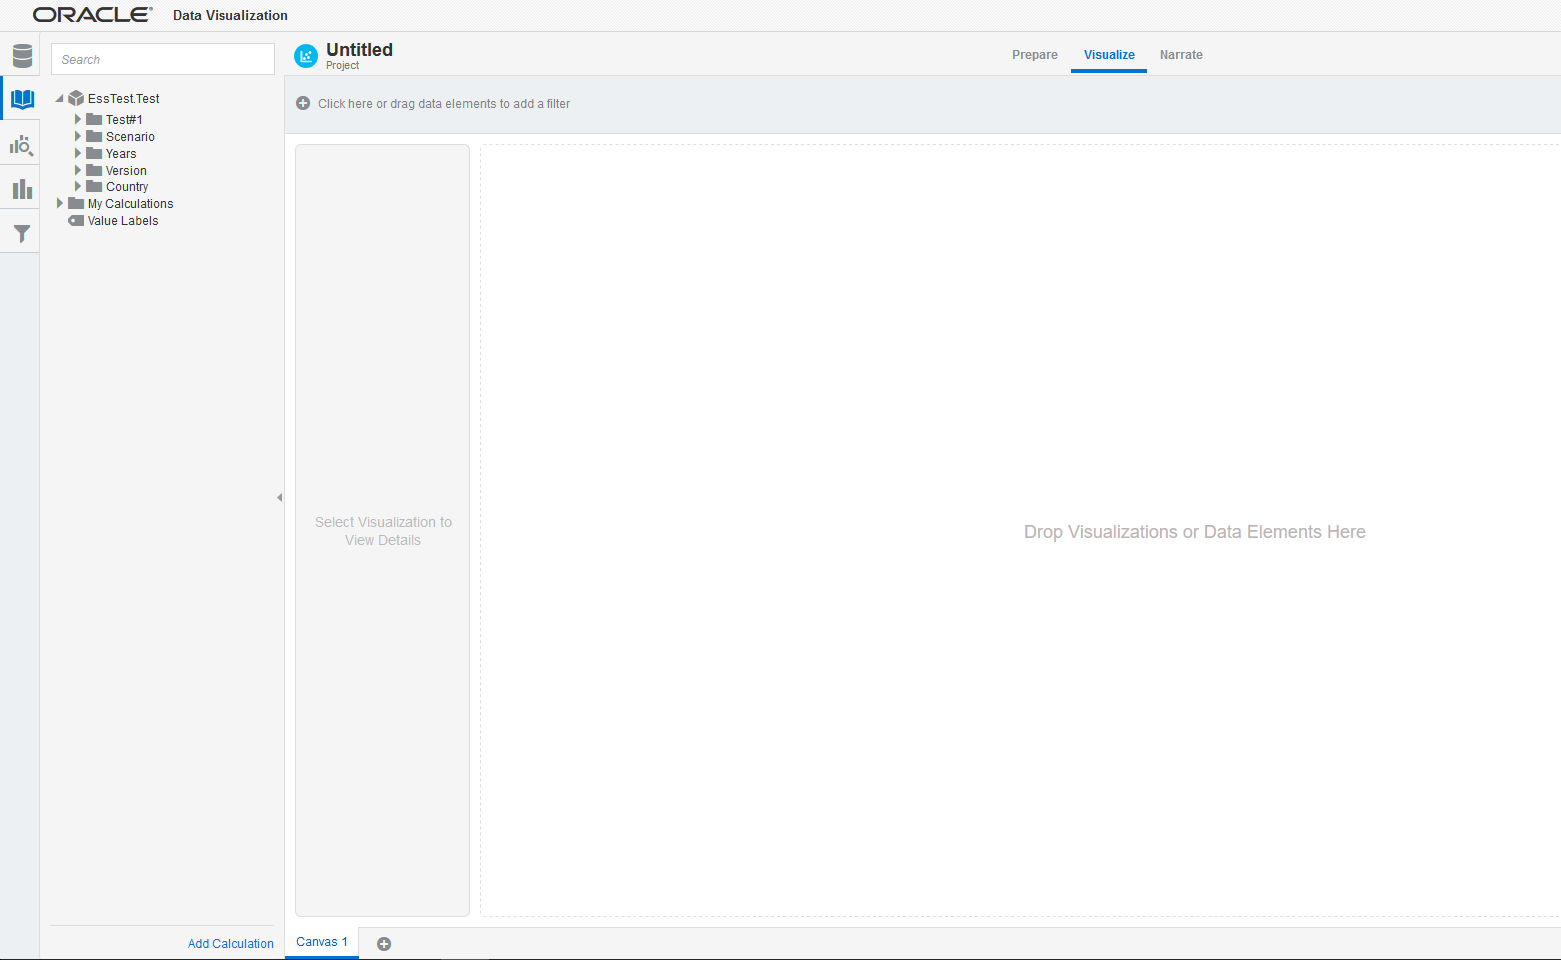
Creating new Project will land you in Data Visualization.


Creating new Analysis will land you in Oracle BI Answers.


Back to Data Visualization, on the left side you can see the Essbase model and it's ready to be used in the report. Yeah it's so easy!.

So here is my Essbase model, you can see the two measures (Account members) I created.


What if you want to add calculated measures? Well it is very easy, right click on "My Calculations" and Add Calculation.


I want to calculate Expense because it's no available in my model,  I will simply drag/drop Total Revenue. drag/drop the minus operator, and drag/drop Net Profit


After saving the calculation it will show up in the model and that's it.


You can start building your report by selecting the measures you want to report on, the dimensions, and the filters you want to apply by simple drag and drop movements. You can create multiple canvases, add narrative data, change the visualization type (Bar, Pie,.....). So here is the data I entered in SmartView in tabular format.


Here are my measures.


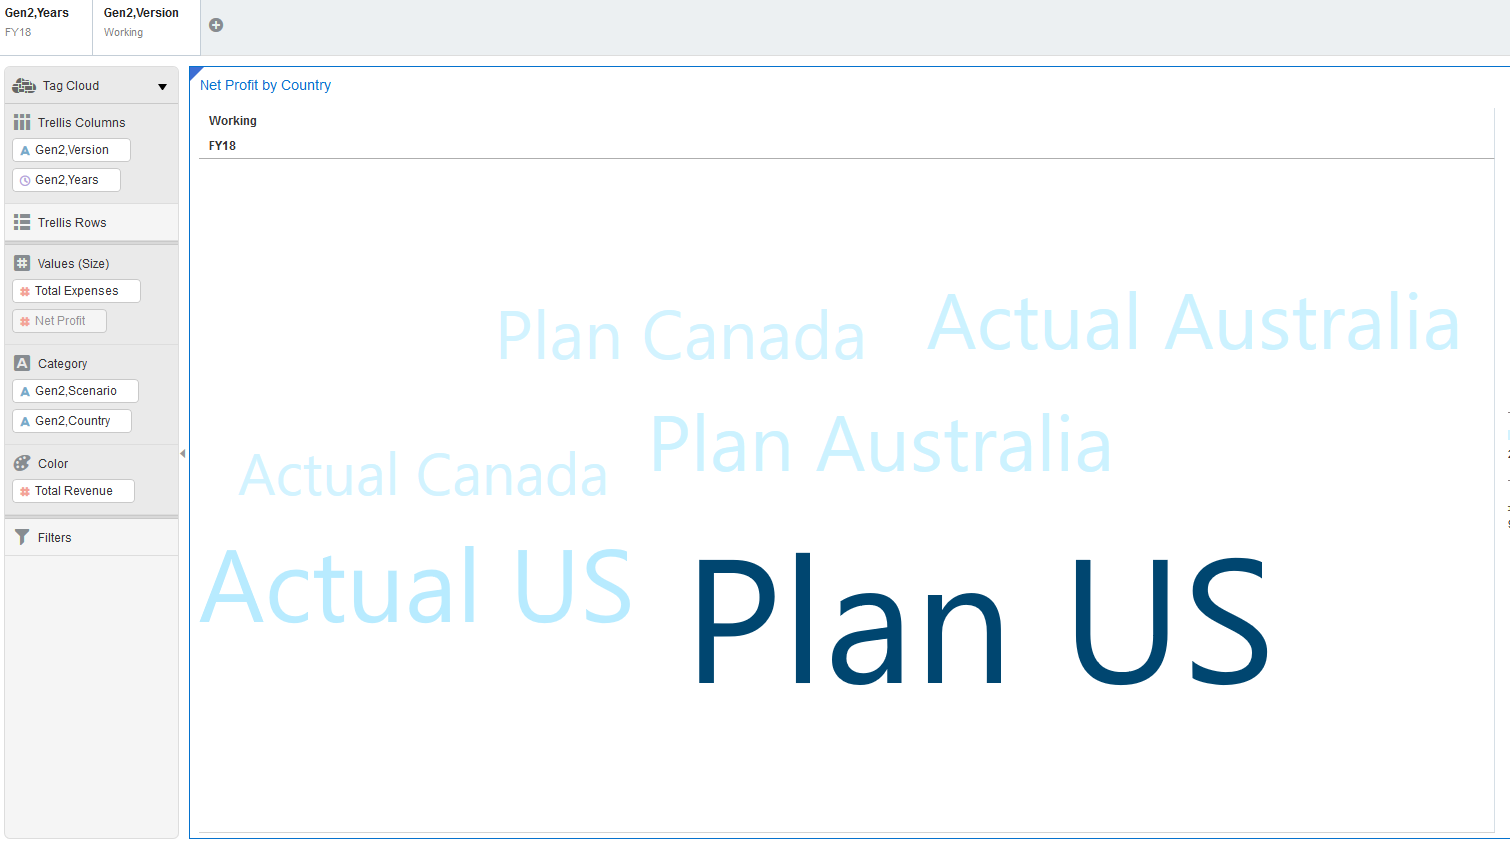
I can color-highlight the best performing country for any measure by placing the measure in "Color" section, so here I want to highlight the country with the best Net profit margins.


Or I can change the font size of the country with the biggest Expenses.


You can easily change the visualization of the data in one click.


For example "Tag Cloud" visualization.


"Pie" visualization.


Want more colors? Piece of cake.


So you can put together the data you want and visualize anyway you want, add narrative data, and present it in a nice way.


My conclusion? Data Visualization is an awesome and super powerful tool, very easy to use and extremely smooth. You don't need to be a technical guru to build a fancy dashboard. And bear in mind I only showed a very simple report for the sake of simplicity, in reality you can do a lot more...and the best part? You don't need to code anything.