Tuesday, September 14, 2021

The Case for Serverless Backups using Oracle Functions

 This post is the first post of two part series about serverless functions in Oracle Cloud Infrastructure, why they appear to be popular, how they're invoked in OCI and finally, a use case on how to build a serverless function to automate the backups of an EPM Cloud application.

Let's start by what is an Oracle Function as defined by Oracle:

“Oracle Functions is a fully managed, multi-tenant, highly scalable, on-demand, Functions-as-a-Service platform. It is built on enterprise-grade Oracle Cloud Infrastructure and powered by the Fn Project open source engine.

The serverless and elastic architecture of Oracle Functions means there's no infrastructure administration or software administration for you to perform. You don't provision or maintain compute instances, and operating system software patches and upgrades are applied automatically.”

To simplify it further, think of functions as single-purpose programs that can run anywhere and do not require dedicated infrastructure resources like compute instances, block volumes for storage etc. You can find more information here.

Why are they popular? I won’t go delve into the never ending debate on which is approach is better, monolithic vs microservices vs functions-based application architecture, there are pros and cons for each approach and I believe they all will coexist together because there is no one size fits all architecture for all applications.

For me, serverless functions are appealing because they don’t require dedicated infrastructure resources to setup, they can be programmed in many languages (Python, Java, Go, Node and Ruby), they can be invoked in many ways and you only pay for resources used while the function is running, not idle.


Serverless backups

Typically, the standard approach for designing EPM application backups , or any other system for that matter, relies on having a dedicated server running in a customer-managed data centre or the cloud to configure the backup automation scripts, install required tools such as EPM Automate and schedule jobs etc.

So, how do we go serverless using Oracle Functions?

In the following example, I will demonstrate how to design a cloud-native backup solution for an EPM Cloud application using Oracle Functions.

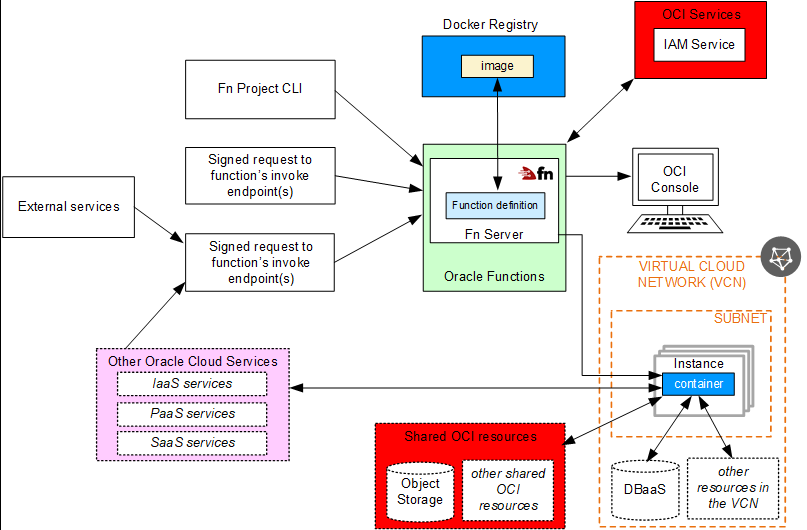
The process of creating, deploying and invoking functions is summarised in the following diagrams taken from Oracle documentation (if you are not familiar with Docker containers, you can read more about it here.)

  1. Create container image with the function code and yaml file
  2. Deploy and push the image to your container registry
  3. Invoke the function using any of the available methods (I will cover two methods in this post, and the other available methods in a subsequent post)

Deploy functions


Invoke functions


Let's start developing the function. In OCI, you can build create and deploy Docker images in three ways:

1.      Cloud Shell

2.      Local machine

3.      OCI Compute Instance


In this post, I will be using Cloud Shell for the following reasons:

1.      It is easy to start with (no need to install and configure Docker)

2.      OCI CLI is installed and preconfigured

3.      Python is preinstalled (I only need it for testing my code before deploying the function to the container)


It is also recommended to create a compartment so you can do your development in one compartment, I have also created a container repository to push the Docker images to, an application for the function, an object storage bucket to store the backup files and a vault to store EPM and user token secrets needed for authentication.

The first step is to create a Docker image template and to do this, we need to login to the OCI console, launch Cloud Shell, and create the Docker image using the following command


fn init --runtime python3.8 serverless-backups


As shown in the following screenshot, this command will create a "hello-world" Python 3.8 Docker base image for a function called serverless-backups, requirements.txt file for packages and yaml config file.


The second step is to add the Python code for my function, and add OCI package in requirements.txt (By default, oci is not included in the image and we need this particular package to access vaults APIs).

The standard image is pre-configured with hello-world function as follows:


Using vim editor, I will update the code with my new Python function.


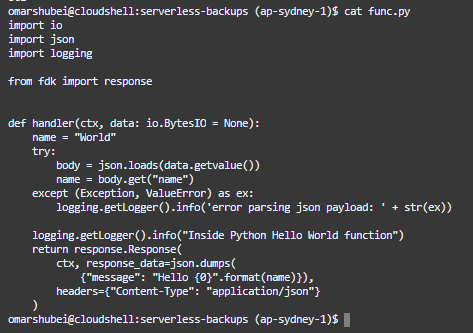
Here is the code in snippet format:

 1
 2
 3
 4
 5
 6
 7
 8
 9
10
11
12
13
14
15
16
17
18
19
20
21
22
23
24
25
26
27
28
29
30
31
32
33
34
35
36
37
38
39
40
41
42
43
44
45
46
47
import io
import json
import logging
import oci
import http.client
import base64


from fdk import response
from datetime import datetime


#Get secret content function in base64
def get_secret_base64(secret_id):
    signer = oci.auth.signers.get_resource_principals_signer()
    try:
        client = oci.secrets.SecretsClient({}, signer=signer)
        secret_content = client.get_secret_bundle(secret_id).data.secret_bundle_content.content
    except Exception as ex:
        print("Error getting secret contents", ex, flush=True)
        raise
    return  secret_content
#Main function
def handler(ctx, data: io.BytesIO = None):
    cfg = ctx.Config()
    epmURL = cfg["epmURL"]
    osURL = cfg["osURL"]
    sec1_ocid = cfg["epm_secret"]
    sec2_ocid = cfg["token_secret"]
    #Get EPM credentials and auth toen for object storage
    epm_login_secret = get_secret_base64(sec1_ocid)
    object_storage_token = get_secret_base64(sec2_ocid)
    #Backup details
    backup_time = datetime.now().strftime("%Y_%m_%d-%I:%M:%S_%p")
    os_pwd = base64.b64decode(object_storage_token.encode('utf-8')).decode('utf-8')
    os_url = osURL+backup_time+".zip"
    os_user = "epm_cloud_test_user"
    os_snapshot = "Artifact Snapshot"
    conn = http.client.HTTPSConnection(epmURL)
    payload = "url="+os_url+"&username="+os_user+"&password="+os_pwd+"&filepath="+os_snapshot
    headers = {
                        'Content-Type': 'application/x-www-form-urlencoded',
                         'Authorization': 'Basic {}'.format(epm_login_secret)
                  }
    conn.request("POST", "/interop/rest/v1/services/copytoobjectstore", payload, headers)
    data = conn.getresponse().read()
    return response.Response(ctx, response_data=data)

get_secret_base64 is a function that will return the content of Vault secrets in Base64 (here is an excellent blog by the A-Team on working with vaults in Python).

Handler section is considered the main function and is the entry point for the function (similar to Java's public static void main(string args)).

The following section is where I'm calling the get_secret_base64 function and passing the secrets' OCID to get the EPM credentials and Object Storage tokens contents in base64. (OCID and URL information is stored in configuration key pairs defined at the function level)

1
2
3
4
5
6
7
8
    cfg = ctx.Config(
    epmURL = cfg["epmURL"]
    osURL = cfg["osURL"]
    sec1_ocid = cfg["epm_secret"]
    sec2_ocid = cfg["token_secret"]
    #Get EPM credentials and auth toen for object storage
    epm_login_secret = get_secret_base64(sec1_ocid)
    object_storage_token = get_secret_base64(sec2_ocid))


In the next line, I'm decoding the authentication password for Object Storage to plaintext so I can use in CopyToObjectStorage REST API.

os_pwd = base64.b64decode(object_storage_token.encode('utf-8')).decode('utf-8')

Finally, I'm calling EPM Cloud's CopyToObjectStorage API to copy the Artifact Snapshot backup file to an Object Storage bucket called serverless-backups.

 1
 2
 3
 4
 5
 6
 7
 8
 9
10
11
12
13
14
    backup_time = datetime.now().strftime("%Y_%m_%d-%I:%M:%S_%p")
    os_pwd = base64.b64decode(object_storage_token.encode('utf-8')).decode('utf-8')
    os_url = osURL+backup_time+".zip"
    os_user = "epm_cloud_test_user"
    os_snapshot = "Artifact Snapshot"
    conn = http.client.HTTPSConnection(epmURL)
    payload = "url="+os_url+"&username="+os_user+"&password="+os_pwd+"&filepath="+os_snapshot
    headers = {
                        'Content-Type': 'application/x-www-form-urlencoded',
                         'Authorization': 'Basic {}'.format(epm_login_secret)
                  }
    conn.request("POST", "/interop/rest/v1/services/copytoobjectstore", payload, headers)
    data = conn.getresponse().read()
    return response.Response(ctx, response_data=data)


Now it is time to deploy the function to the registry using the following command.

fn deploy --app serverless-backups


Once complete, you will "Successfully created function:...." as shown here.


To list the Docker images, I can run "Docker images".


Now we have the function deployed, we can review the image details that has been pushed using OCI CLI or by using Console. For example, here is the registry I just deployed the function to:


The deployed function (notice the invoke endpoint which will be used to invoke the function using raw-request CLI command next).


Last but not least, let us invoke this function using two methods: "fn invoke" and oci's "raw-request" cli command.

In Cloud Shell, invoke the fn function using the following command

fn invoke serverless-backups serverless-backups

Notice the function ran successfully and returned a JSON response.


I can verify a new backup has been copied to the bucket.


I can also invoke the function using raw-request cli command as follows (you need the invoke endpoint for the function which is shown in the previous function screenshot):

oci raw-request --http-method POST --target-uri


Another backup file has been copied to the bucket.


That is it for this post, I've just demonstrated how to build a serverless function that copies the latest EPM Cloud backup file to an object storage bucket in OCI using Oracle Functions.

In subsequent posts, I will expand on this and go through other ways we can invoke functions using Events, Alarms and OIC to further demonstrate how "serverless" functions can be embedded and used in the overall OCI ecosystem.

Thank you for reading.


Sunday, September 5, 2021

Quick tip - Deploying Essbase 21c in Oracle Cloud Infrastructure

This post is about some tips on how to successfully deploy Essbase 21c marketplace offering in OCI. 

Thanks to OCI's Resource Manager, this task is straight-forward and is not time-consuming. That said, it is easy to miss a single step and ending up spending hours troubleshooting an issue you shouldn't have in the first place.

The pre-deployment configuration steps are as follows:

  1. Create compartment 
  2. Create a vault, encryption key, create secrets for your admin passwords and note down the OCID.
  3. Decide on your database option for RCU schemas (you can use an existing database or create a new database as part of the stack deployment)
  4. Create dynamic groups and policies
  5. Configure IDCS if needed (in this case, I'm using embedded LDAP since it is a Dev environment. For Production environments, you need to configure IDCS application and users)
I'm not going to cover each step in detail but rather focus on the task that got me in trouble the first time I tried to deploy Essbase which is dynamic groups and policies. The lazy side of decided to assume the tenancy compartment level defined policies are going to be sufficient for the deployment since I'm using a user with full OCI administration privileges. 

Here is the what I have defined for the first time:


Notice I just have one policy statement:

ALLOW GROUP Admninistrators to manage all-reources in comaprtment Essbase-Dev2


The policy looked sufficient to me, it basically means any user in Administrators group can manage all resources in Essbase-Dev2 compartment, so let me proceed with the deployment and see how it goes.

Go to Marketplace and search for Essbase - UCM (If you have an existing license, you can select BYOL option)

Next step is to provide the secret OCID for the Essbase admin user.


Next step is to configure the Identity Provider, since this is a dev environment I'm going to use embedded LDAP as my Identity Provider.


Finally, I need to specify the database option, and provide the secret OCID for the database admin user.


Next step is to create and deploy the resource manager stack, and wait for it to finish. This step would take anywhere from 2 to 5 minutes tops, once it is finished you can find the server information in "Application Information tab".

It is important to note that the actual Essbase server-side configuration will take another 10 to 15 minutes to complete. You can check the log status in /var/log/essbase-init.log


Next step is to launch Essbase and confirm it is up and running and here is when I notice something has gone wrong! After waiting for 20 minutes, I keep getting the site can't be reached so it is obvious that something did not work according to the plan.


To get a better idea, I searched for more information in /var/etc/log and here is what I found

Basically, the status of each and every configuration item is

"The service returned error code 404"

404 error means nothing exists at the given URI, in other words the services the resource manager is trying to configure are not available

The error message is not very helpful if you ask me, so I had to go back and try to find out what exactly went wrong, and I suspected  it might be due to the missing policies that Resource Manager needed in order to deploy the stack. (Remember I didn't create a dynamic group and assign policy at that level). 

It turned out I was right, it took me an hour to figure out, and it was the missing dynamic group and policies that caused this issue. So to fix this, I had to do the following:

  1. Create a dynamic group 
  2. Add "Essbase-Dev2" compartment to the matching rules of the group
  3. Create specific policies as instructed in Essbase deployment documentation
Here is a screenshot of the dynamic group and the matching rule.


And the policies at group level.


All I have to do now is repeat the same deployment steps again, but first I want to terminate the faulty instance and create a new deployment job.


Fast forward 20 minutes and here is the  new /var/log/essbase-init.log which looks much better this time.


This time I managed to confirm the WebLogic servers and services are up and running.


Finally, I confirmed I can access and login to the new environment.


That's it for today, I hope you find this post helpful.

Wednesday, August 18, 2021

Fully Automated Cloud-based EPM Backups in OCI

I've been having a bit of time on my hands lately thanks to the current covid lockdown we have in Australia and I got to spend more time setting up my Oracle Cloud Infrastructure(OCI) tenancy. 

One of the topics I wanted to write about is a fully automated cloud-based backup solution for EPM Cloud in OCI. The solution I'm going to covert in this post is 100% in the cloud with no on-premise resources/dependencies at all! Pretty cool if you ask me, so let's get to it.


This diagram is a very high-level architectural diagram of the solution:


So, the main OCI components we are looking at here are as follows:


  1. Linux Virtual Machine
  2. Virtual Cloud Network
  3. Object Storage bucket for backup files
  4. Object Storage bucket for log files
  5. Logging services
  6. Service Connector Hub
  7. Topics, Subscriptions and Alarms
  8. EPM Automate and CLI

I will explain the OCI components used a little bit more as I go through the technical solution in the following sections. The idea in a nutshell is to use Linux machine to do the job for us, how would that process look like from start to end?

  1. Check if the backup file exists in Object Storage (this can be easily sipped with timestamps)
  2. Delete the file in Object Storage if it exists
  3. Login to EPM Cloud and Copy the Artifact Snapshot to Object Storage
  4. Send job status email notifications
  5. Delete old backup files in OCI to maintain n number of days of backups


One last thing before I show how to setup those steps and automate the solution from start to end, the following is a list of prerequisites that must are needed for the solution to work.

Create user to use with OCI related jobs

Create group and add the user to it

Generate Auth Token for the user in step#1 (EPM Automate copyToObjectStorage requires Auth token, NOT the OCI console login password)

Create IAM policy to grant the group created in step#2 the appropriate access to Object Storage (here is a snippet of my policy statements, ObjectStorage is the name of the group)

You don't need to assign OBJECT_DELETE permission so this one is optional. You just need the user to be able to create new files in Object Storage because the EPM Automate command requires a user with sufficient Object Storage privileges.


Now we are done with the prerequisites, let me start with the components of the overall solution:

Bash script

This is the main script I will be adding to the list of cron jobs.


Now let me highlight the bits that I think needs some explanation.

The next line retrieves the latest backup file stored in the bucket by using OCI list objects commands and jq which is a JSON processor and stores the filename in a variable to be used in the next section.

latestfile=`oci os object list --bucket-name $bucket |  jq -r '.data[-1].name'`

Example:


This section checks if the snapshot file we are about to copy to the object storage exists in OCI, if it exists, then delete the file before the backup process kicks off. This section can be easily replaced by an hourly timestamp if required, but for demo purposes I have decided to keep in this post just in case someone out there benefits from it.


#delete file in OCI
if [[ $latestfile == $snapshotname ]]
  then 
  echo "file exists $latestfile $snapshotname"
  oci os object delete --bucket-name $bucket --object-name $snapshotname --force
  else
  echo "file does not exist $latestfile $snapshotname"
fi

Next is the "copyToObjectStorage" EPM Automate command, and the next block is to check if the copy was successful or not, and finally send email job status notifications.

$epmauto copyToObjectStorage "Artifact Snapshot" "$oci_user" "$oci_token" https://swiftobjectstorage.ap-sydney-1.oraclecloud.com/v1/NamespaceOCIDgoeshere/$bucket/$snapshotname &> $logmessage

if [ $? -eq 0 ]
 then
  $epmauto sendMail "$email" "EPM Cloud automated backup completed successfully" Body="EPM Cloud automated backup completed successfully"
 else
  emailBody=$(tac  $logmessage|grep -m 1 .)
  $epmauto sendMail "$email" "EPM Cloud automated backup completed with errors" Body="EPM Cloud automated backup completed with the following error message: $emailBody"
fi

If you look carefully, you will notice I'm saving the output of the copyToObjectStorage EPM Automate command in a log file and the reason for that is I need a way to catch the error message and include it in the email body.

                                &> $logmessage

Since this is a REST based command, the first line of the output might not be the error message we are looking for. So I'm simply writing a new file every time the process is run and if the copy operation failed, then I'm fetching the last line in that log file and including it in the email body.

Here is a an example of a log file containing an error message and how to get the error message out of it.


The final block of the script is to only keep n number of backup files in the Object Storage bucket. To get the filename that must be deleted, I'm using jq to parse the JSON output of the "oci os object list", sort out based on creation date and fetch the first item in the array (i.e. the oldest item) to pass on to the cli delete command.

#Delete backups older than a week

i=`oci os object list -bn $bucket | jq  '.data | length'`
for ((e=$i; e > $numberofdaytokeeps; e-- ))
 do
 x=`oci os object list -bn $bucket | jq -r '.data | map({"name" : .name, "date" : ."time-created"}) | sort_by(.date) | .[0].name'`
 echo "Deleting the $e th file: $x"
 oci os object delete --bucket-name $bucket --object-name $x --force

 done

Object storage

I'm using two OS buckets, one to store the EPM backup files and one for the OCI logs.


I have enabled the write logs for the main bucket so that I can generate the logs in the next step.


Service connector

I'm using a service connector to automatically move the logs to Object Storage, I've configured this connector to move the logs every time there is a "put request" activity.


Alarms

The final component in the solution (it is really a nice to have but it is worth having because OCI is awesome I guess?) is an alarm definition that is used to trigger email notifications if there are no files copied to the storage bucket in the last 24 hours.


As you can see the alarm status is "ok" which means there has been a successful put request in the specified OS bucket.

Cron jobs

The final piece of the puzzle is to automate this process by creating a crontab entry to run the bash script and that is it.


That is it! the solution is ready and live. I've been running this scripts for quite some time now and here is my OS bucket:


The backup logs


Sample log:


Notifications

Here is an email of a successful backup job:


Failed job:


There is also an alarm definition that kicks in if there are no files copied in the last 24 hours, to check if the alarm is in firing mode (i.e. something is wrong). For demo purposes, I'm going to change the alarm definition to trigger if less than 2 objects were copied in the last 24 hours so I can show what the alarm notification looks like and how it can be viewed in your OCI mobile application.

Here is a snapshot of the firing alarm, notice the alarm history is showing a metric of the actual number of files copied (one files) versus the value defined in the alarm in red dotted line (2).


All topic subscribers will also get an email notification informing them the alarm is in firing mode. Note the alarm type is OK_TO_FIRING


The cool thing about alarms is you can view them using OCI mobile application which is pretty neat! You can see the status of the alarm, what time it was fired and when was the last time its status was OK.


Now I will change the alarm definition to set to trigger if no objects were copied in the last 24 hours and will show how the alarm status changes and what notification is sent to the topic subscribers. Note the alarm type is FIRING_TO_OK

And the alarm notifications are gone on the mobile application.


That is it for this post, as you can imagine the combination of EPM Cloud and OCI is quite powerful and the sky is the limit when it comes to blending EPM Cloud and OCI resources to get the best out of Oracle cloud.

Thank you for reading.