Thursday, December 8, 2022

Quick tip - Finding out your EPM Cloud Infrastructure Datacentre

This is a quick tip on how to find out whether your EPM cloud running instance is running on OCI Classic or OCI Gen2 datacentre.


The answer is quite simple: find out by viewing your instance's activity reports. The activity report will include a header "Cloud Infrastructure" and it'll state whether it is "OCI Classic" or "OCI (Gen2)".


There is another way, cheeky one I must add, to find out and it is simply when you login to your environment:


OCI Gen2 login screen will look like this:


And OCI Classic login screen will look like this:


This should save you some time next time you are wondering whether you are on Classic on GEN2.


Until next time.


Friday, September 9, 2022

EPCM - A workaround for deleting scheduled jobs

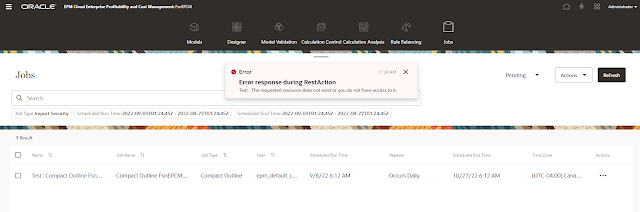
I have found a workaround that enables me to delete scheduled jobs in Enterprise Profitability and Cost Management (EPCM). Check my last post for more details about the error itself.


Here is the error to begin with.


As you can see above, I cannot simply delete the job straight away (this is still a bug as of the date of this post), so what I need to do is create an LCM export for that job, modify the xml file, and re-import the file again.

1. Export the LCM job definition 


2. Export the LCM definition and download the file locally


3.Edit the XML file and change the end dates to a past date


This is the original XML file

In snippet format:
<?xml version='1.0' encoding='UTF-8'?><Scheduler><job name="Compact Outline" type="23"><jobParam name="DefaultQuartzJob:jobApplication" type="java.lang.String" value="FsnEPCM"></jobParam><jobParam name="DefaultQuartzJob:jobClassName" type="java.lang.String" value="com.hyperion.planning.schedulejobs.CubeCompactionScheduleJob"></jobParam><jobParam name="DefaultQuartzJob:jobCreateDate" type="java.util.Date" value="1662724800000"></jobParam><jobParam name="DefaultQuartzJob:jobIdentity" type="java.lang.String" value="epm_default_cloud_admin"></jobParam><jobParam name="DefaultQuartzJob:jobObjectName" type="java.lang.String" value="Compact Outline FsnEPCM.PCM_CLC"></jobParam><jobParam name="DefaultQuartzJob:jobObjectType" type="java.lang.Integer" value="23"></jobParam><jobParam name="DefaultQuartzJob:jobTrigger" type="com.hyperion.calcmgr.scheduler.triggers.DailyTrigger" value="[Daily] [Starts: Fri Sep 09 12:00:00 GMT 2022] [No End Time] [Cron: 0 0 22 1/1 * ? * Australia/Sydney]"></jobParam><jobParam name="DefaultQuartzJob:jobUserInputName" type="java.lang.String" value="Compact Outline"></jobParam><jobParam name="DefaultQuartzJob:origStartTime" type="java.util.Date" value="1662724800000"></jobParam><jobParam name="DefaultQuartzJob:timeZone" value="Australia/Sydney"></jobParam><jobParam name="Job Name" type="java.lang.String" value="Compact Outline FsnEPCM.PCM_CLC"></jobParam><jobParam name="appName" type="java.lang.String" value="FsnEPCM"></jobParam><jobParam name="dbName" type="java.lang.String" value="PCM_CLC"></jobParam><jobParam name="jobObjectKey" type="java.lang.String" value="23"></jobParam><jobParam name="physicalAppName" type="java.lang.String" value="AFsnEPCM"></jobParam><jobParam name="reviewData" type="java.util.LinkedHashMap"><property name="Job Type">Compact Outline</property><property name="Job Name">Compact Outline FsnEPCM.PCM_CLC</property></jobParam><jobParam name="reviewDetails" type="java.util.LinkedHashMap"><property name="Name">Compact Outline</property><property name="Job Type">Compact Outline</property><property name="Job Name">Compact Outline FsnEPCM.PCM_CLC</property></jobParam><trigger type="Daily" origStartDate="1662724800742"></trigger></job></Scheduler>


This is the modified XML file


In snippet format
<?xml version='1.0' encoding='UTF-8'?><Scheduler><job name="Compact Outline" type="23"><jobParam name="DefaultQuartzJob:jobApplication" type="java.lang.String" value="FsnEPCM"></jobParam><jobParam name="DefaultQuartzJob:jobClassName" type="java.lang.String" value="com.hyperion.planning.schedulejobs.CubeCompactionScheduleJob"></jobParam><jobParam name="DefaultQuartzJob:jobCreateDate" type="java.util.Date" value="1662724800000"></jobParam><jobParam name="DefaultQuartzJob:jobIdentity" type="java.lang.String" value="epm_default_cloud_admin"></jobParam><jobParam name="DefaultQuartzJob:jobObjectName" type="java.lang.String" value="Compact Outline FsnEPCM.PCM_CLC"></jobParam><jobParam name="DefaultQuartzJob:jobObjectType" type="java.lang.Integer" value="23"></jobParam><jobParam name="DefaultQuartzJob:jobTrigger" type="com.hyperion.calcmgr.scheduler.triggers.DailyTrigger" value="[Daily] [Starts: Thu Sep 08 13:00:17 GMT 2022] [Ends: Thu Sep 08 13:00:17 GMT 2022] [Cron: 17 0 23 1/1 * ? * Australia/Sydney]"></jobParam><jobParam name="DefaultQuartzJob:jobUserInputName" type="java.lang.String" value="Compact Outline"></jobParam><jobParam name="DefaultQuartzJob:origStartTime" type="java.util.Date" value="1662724800000"></jobParam><jobParam name="DefaultQuartzJob:timeZone" value="Australia/Sydney"></jobParam><jobParam name="Job Name" type="java.lang.String" value="Compact Outline FsnEPCM.PCM_CLC"></jobParam><jobParam name="appName" type="java.lang.String" value="FsnEPCM"></jobParam><jobParam name="dbName" type="java.lang.String" value="PCM_CLC"></jobParam><jobParam name="jobObjectKey" type="java.lang.String" value="23"></jobParam><jobParam name="physicalAppName" type="java.lang.String" value="AFsnEPCM"></jobParam><jobParam name="reviewData" type="java.util.LinkedHashMap"><property name="Job Type">Compact Outline</property><property name="Job Name">Compact Outline FsnEPCM.PCM_CLC</property></jobParam><jobParam name="reviewDetails" type="java.util.LinkedHashMap"><property name="Name">Compact Outline</property><property name="Job Type">Compact Outline</property><property name="Job Name">Compact Outline FsnEPCM.PCM_CLC</property></jobParam><trigger type="Daily" endate="1662642017034" origStartDate="1662642017034"></trigger></job></Scheduler>


4. Finally, import the updated LCM file


Once the file is imported, you will see the updated "Repeats" and "Scheduled End Time"  for the scheduled job.


Depending on whether you have selected an end date in the past, or not, the job will be updated to reflect the new end date and once it passes that date, the job will be completely removed from the scheduler.


Saturday, September 3, 2022

EPCM BUG - Error deleting scheduled jobs

So I came across this error in EPCM that is stopping me from deleting scheduled jobs. 


As of the creation date of this post, I'm unable to delete or edit a created scheduled job in EPCM, so until there is a fix for this, I suggest you do not create scheduled jobs in the interim and look for other workarounds (server side schedules, task manager in another pod etc).


This is the error message I'm getting while attempting to delete the job.


I have create an SR with and they have replicated the same issue in-house (this means it is a bug), I will update this post when I have more information.

Wednesday, August 3, 2022

Quick tip - Groovy rule validates successfully but fails to run

 This is a quick post about accessing Calc Manager rules properties using groovy class Rule.


I have the following script that validates just fine.


But if I try to run the rule I get the following error message:


The issue is caused by the rule not being deployed to the Planning tables:


The solution is simple. Deploy the run the rule again!


Monday, July 18, 2022

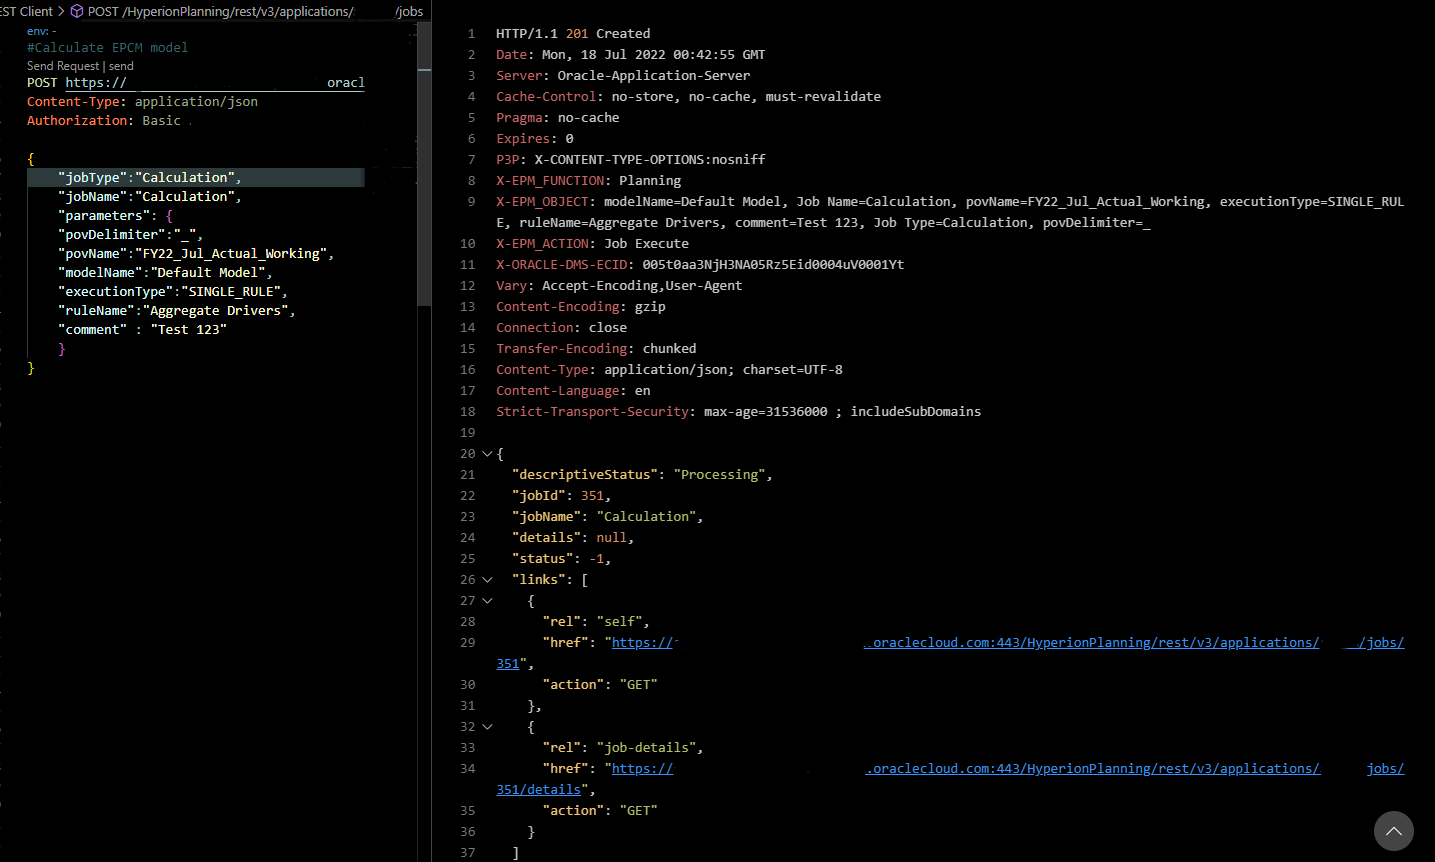
Enterprise Profitability and Cost Management (EPCM) - REST API - Calculate Model

 I found a typo in the Calculate Model REST API  in EPCM documentation that made go around in circles for a couple of hours trying to figure out what exactly is the problem! I already got in touch with the Oracle team in charge of the documentation and they are going to update the documentation at some point, so this post is about navigating such issues in the futures.


So the doco says the parameters (jobType and jobName) are required and their values must be "Calculate Model"


However, when I first tried to use this API using the exact same information, I got the following error:

"A job with name Calculate Model and type Calculate Model was not found. Try again with a valid job name and type"


Here comes the going around in circles bit, I'm following the exact instructions provided in the documentation so I thought there must be a typo somewhere, so what is the best way to find out the issue? EPM Automate commands is the correct answer, I know there is "calculateModel" epm automate command so I thought I will run the command, analyse the logs, and search for the correct parameter values.

After doing so, I found out the correct parameter values for jobName and jobType is "Calculation", not "Calculate Model" as per the screenshot below:

So I updated my REST request and replaced "Calculate Model" with "Calculation" and, Voila! it worked like a charm!


Enterprise Profitability and Cost Management (EPCM) - Quick Tips - The Rule Model does not exist for selected POV.

 This is another quick tip about an ambiguous error I came across while implementing EPCM for a client of mine. The error stopped me from calculating the model and it just says "The rule Model does not exist for selected POV" (which is not extremely helpful if you ask me).


Luckily, the solution is straight forward after I ran the Model Validation" and it turned out to be a renamed member that is no longer referenced in the rule.


And this is the error you will see when you edit the specified rule.


Finally, just update the rule and point to the renamed member and that's about it, you are good to go!

Enterprise Profitability and Cost Management (EPCM) - Quick Tips - NullPointerException

 I came across this very generic error while implementing EPCM for a client of mine and as you can see, the error is not informative. the error popped out while selecting ruleset range and all rules options only.


And after a lot of digging I found out this issue was caused by new rules that were never calculated before and in order to work around it, I ran the rule individually (as a single rule processing range) and the error never popped up again.


I don't know if you are going to experience this issue or not, but if you do, the solution is simple. just run and calculate the new rules at least one time as "SIGNLE RULE" before selecting ALL RULES or RANGE option.


Monday, April 11, 2022

Groovy and Essbase Cloud APIs - Part 3

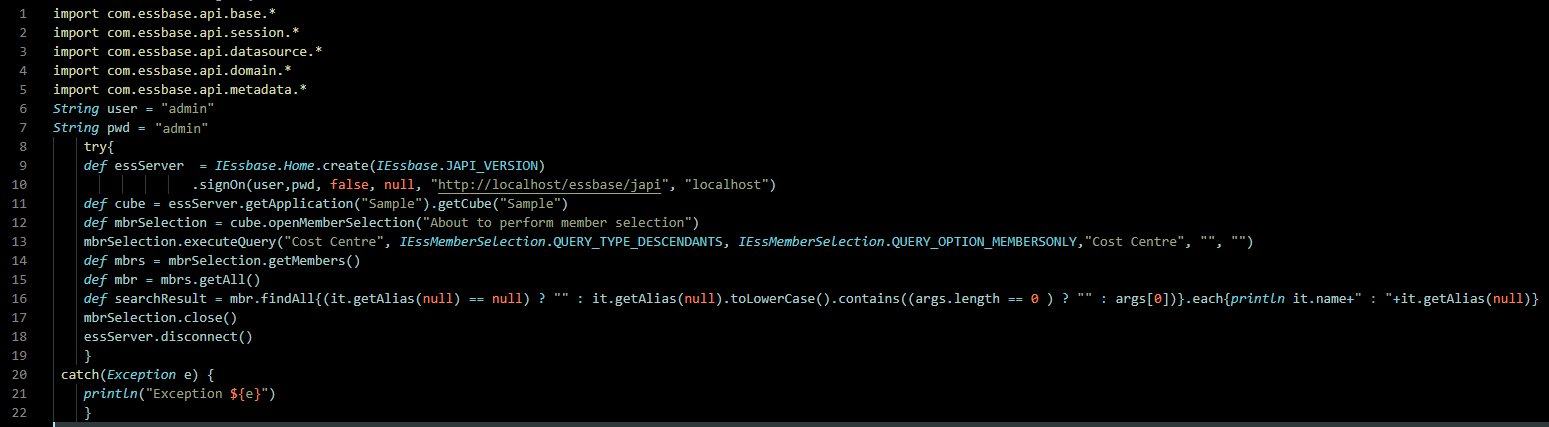
 In my previous post, I showed you how to setup Essbase API working directory and create a simple Groovy script. In this post, I will explain what the script is doing and how to run it.

First, I'm defining an Essbase connection and a cube to connect to

def essServer  = IEssbase.Home.create(IEssbase.JAPI_VERSION

                  .signOn(user,pwd, false, null, "http://localhost/essbase/japi", "localhost")


def cube = essServer.getApplication("Sample").getCube("Sample"))

Define a member selection query on Cost Centre dimension and get all members.

def mbrSelection = cube.openMemberSelection("About to perform member selection"

    mbrSelection.executeQuery("Cost Centre", IEssMemberSelection.QUERY_TYPE_DESCENDANTS, IEssMemberSelection.QUERY_OPTION_MEMBERSONLY,"Cost Centre", "", ""))

Get the members returned from the query, find all members with aliases that match the passed argument and print them all.

def mbrs = mbrSelection.getMembers()

def mbr = mbrs.getAll()

def searchResult = mbr.findAll{(it.getAlias(null) == null) ? "" : it.getAlias(null).toLowerCase().contains((args.length == 0 ) ? "" : args[0])}.each{println it.name+" : "+it.getAlias(null)})


Now I just have create a .groovy file in the same working directory and save the script.

To run the script, I just need to run it and pass the alias I want to search for.

For example, search for all cost centres with aliases that contain "ope".

groovy helloEssbaseCloud.groovy "ope"


As you can see, the script works without any issues. You can now use Groovy to work with Essbase Cloud APIs instead of Java.

Groovy and Essbase Cloud APIs - Part 2

 In my previous blog, I showed you how to install Groovy on Linux using SDKMAN.

The second step is to create a working directory to put all of Essbase API files and groovy scripts in one place. By default, you need oracle user to access the API files, so I’m going to copy them into a directory under opc user which I’m going to use to run my Groovy scripts.

The API files are located under /u01/oracle/essbase/common/EssbaseJavaAPI/*

I’m going to need three jar files

1.      ess_japi.jar

2.      ess_es_server,jar

3.      ojdl.jar

To copy the files, I will run the following commands:

sudo cp /u01/oracle/essbase/common/EssbaseJavaAPI/lib/ess_japi.jar /home/opc/EssbaseJAPI/ess_japi.jar

sudo cp  /u01/oracle/essbase/common/EssbaseJavaAPI/lib/ess_es_server.jar /home/opc/EssbaseJAPI/ess_es_server.jar

sudo cp  /u01/oracle/essbase/common/Essbase/jlib/ojdl.jar  /home/opc/EssbaseJAPI/ojdl.jar

 The next step is to define CLASSPATH variable.

export CLASSPATH=”/home/opc/EssbaseJAPI/ess_japi.jar: /home/opc/EssbaseJAPI/ess_es_server.jar: /home/opc/EssbaseJAPI/ojdl.jar”


 Create a Groovy Script

The final step is to create the Groovy script, run the script and test it but first I need a use case.

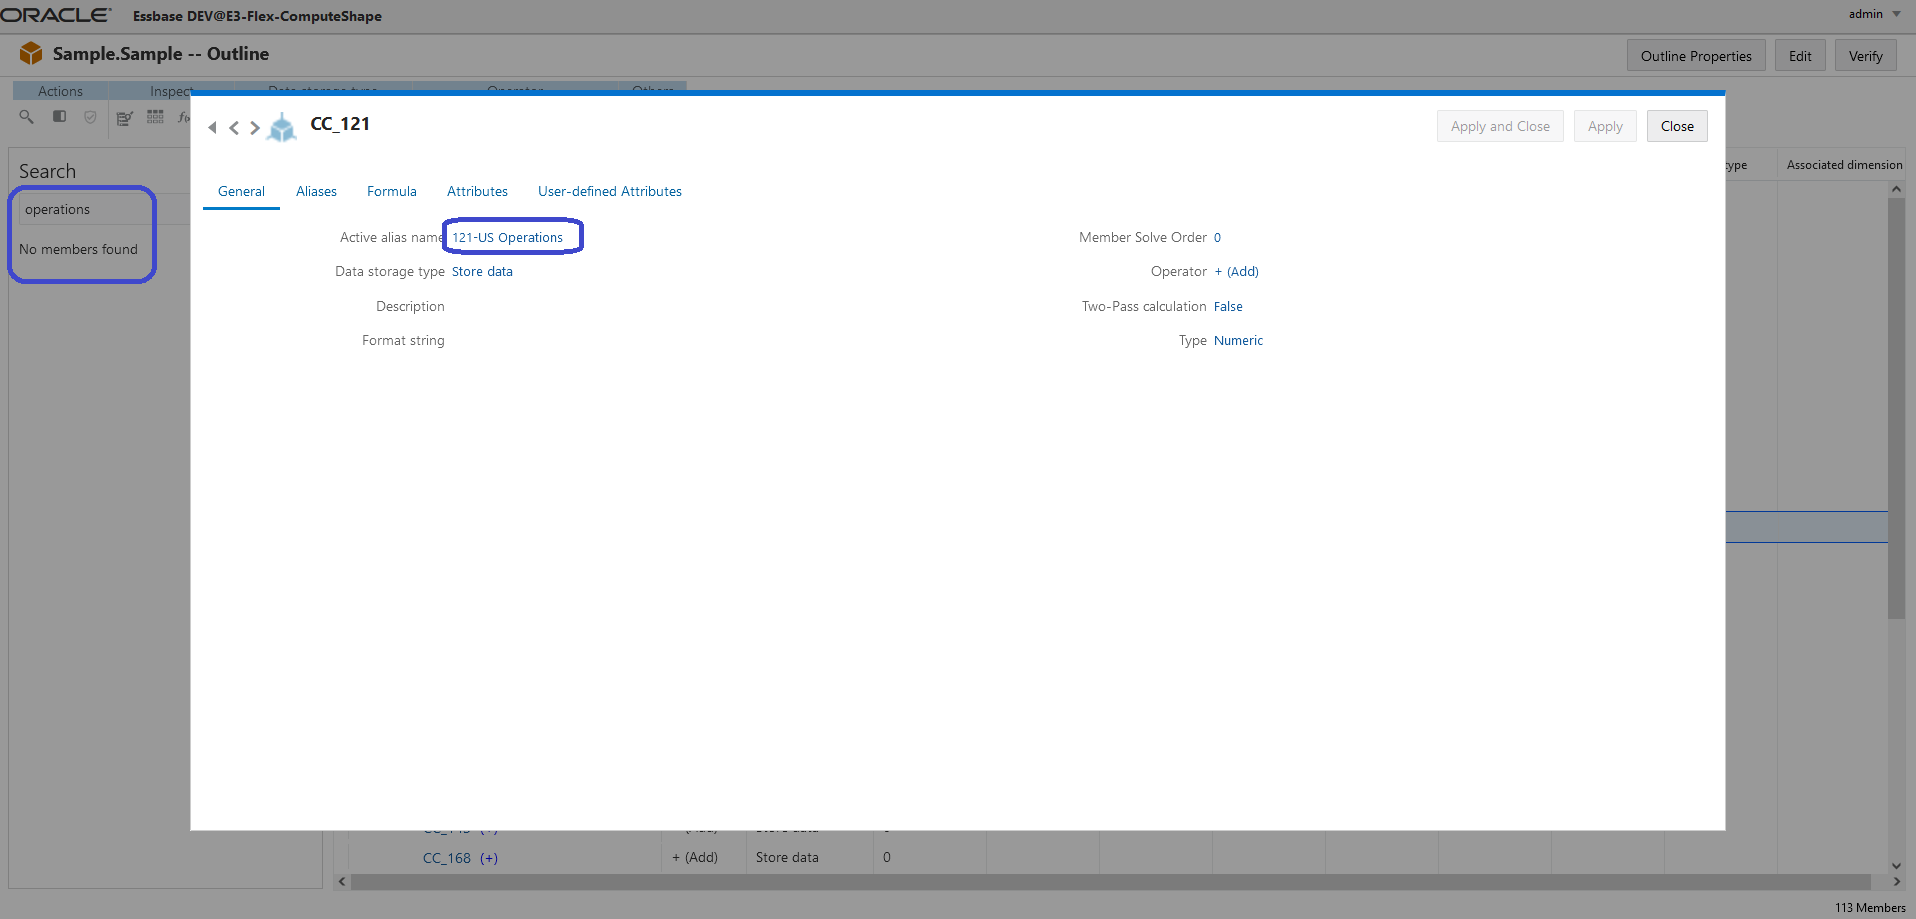
I want to search the Sample application outline for members based on alias descriptions, not member names. The standard outline search feature available via the simplified interface is not going to do the job for me as shown next:


So, I’m going to write a simple Groovy script to search the outline based on member aliases. Here is the code:

I've intentionally used "def" to define untyped variables just to highlight the Groovy nature of the code, I personally like to declare the data type for better readability. For example, instead of "def cube" I would type "IEssCube cube


In my next post, I will explain the code and show you how to run it.


Thanks

Groovy and Essbase Cloud APIs - Part 1

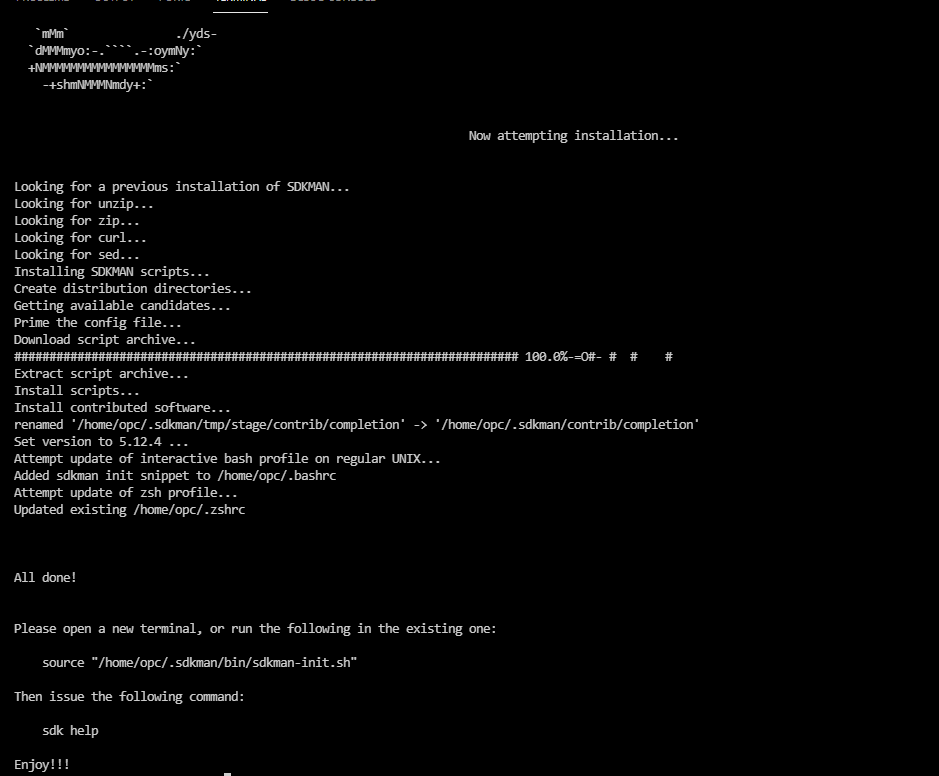
 This post is a quick tip about using Groovy to work with Essbase Cloud Java APIs for those who prefer to code in Groovy instead of Java for whatever reason (in my case I just prefer the simplified Groovy syntax). Everything I’m about to demonstrate here applies to any Java API, be it Essbase on-premise or OCI etc.

For this demo purposes, I will be using OCI marketplace Essbase 21c deployment.

Install Groovy

The first step is to set up Groovy on the Essbase instance, there are many ways you can install Groovy but I prefer the Software Development Kit Manager (SDKMAN). To install using SDKMAN do the following:
  1. Login to Essbase instance using opc user via SSH (using PuTTy, VSCode, PS etc)
  2. Initialise and prepare the environment by typing


Finally, install Groovy


Groovy is now installed and GROOVY_HOME is set.


In the second part we will configure Essbase working directory and show how to use Groovy with Essbase Java APIs.


Tuesday, September 14, 2021

The Case for Serverless Backups using Oracle Functions

 This post is the first post of two part series about serverless functions in Oracle Cloud Infrastructure, why they appear to be popular, how they're invoked in OCI and finally, a use case on how to build a serverless function to automate the backups of an EPM Cloud application.

Let's start by what is an Oracle Function as defined by Oracle:

“Oracle Functions is a fully managed, multi-tenant, highly scalable, on-demand, Functions-as-a-Service platform. It is built on enterprise-grade Oracle Cloud Infrastructure and powered by the Fn Project open source engine.

The serverless and elastic architecture of Oracle Functions means there's no infrastructure administration or software administration for you to perform. You don't provision or maintain compute instances, and operating system software patches and upgrades are applied automatically.”

To simplify it further, think of functions as single-purpose programs that can run anywhere and do not require dedicated infrastructure resources like compute instances, block volumes for storage etc. You can find more information here.

Why are they popular? I won’t go delve into the never ending debate on which is approach is better, monolithic vs microservices vs functions-based application architecture, there are pros and cons for each approach and I believe they all will coexist together because there is no one size fits all architecture for all applications.

For me, serverless functions are appealing because they don’t require dedicated infrastructure resources to setup, they can be programmed in many languages (Python, Java, Go, Node and Ruby), they can be invoked in many ways and you only pay for resources used while the function is running, not idle.


Serverless backups

Typically, the standard approach for designing EPM application backups , or any other system for that matter, relies on having a dedicated server running in a customer-managed data centre or the cloud to configure the backup automation scripts, install required tools such as EPM Automate and schedule jobs etc.

So, how do we go serverless using Oracle Functions?

In the following example, I will demonstrate how to design a cloud-native backup solution for an EPM Cloud application using Oracle Functions.

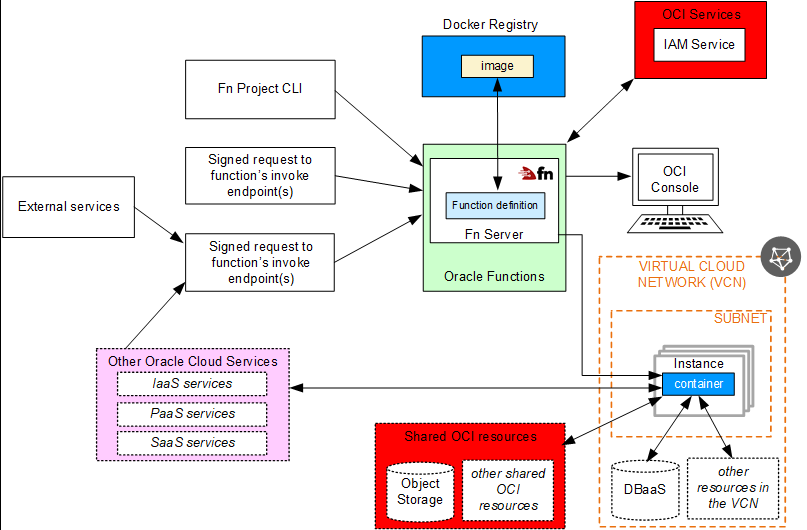
The process of creating, deploying and invoking functions is summarised in the following diagrams taken from Oracle documentation (if you are not familiar with Docker containers, you can read more about it here.)

  1. Create container image with the function code and yaml file
  2. Deploy and push the image to your container registry
  3. Invoke the function using any of the available methods (I will cover two methods in this post, and the other available methods in a subsequent post)

Deploy functions


Invoke functions


Let's start developing the function. In OCI, you can build create and deploy Docker images in three ways:

1.      Cloud Shell

2.      Local machine

3.      OCI Compute Instance


In this post, I will be using Cloud Shell for the following reasons:

1.      It is easy to start with (no need to install and configure Docker)

2.      OCI CLI is installed and preconfigured

3.      Python is preinstalled (I only need it for testing my code before deploying the function to the container)


It is also recommended to create a compartment so you can do your development in one compartment, I have also created a container repository to push the Docker images to, an application for the function, an object storage bucket to store the backup files and a vault to store EPM and user token secrets needed for authentication.

The first step is to create a Docker image template and to do this, we need to login to the OCI console, launch Cloud Shell, and create the Docker image using the following command


fn init --runtime python3.8 serverless-backups


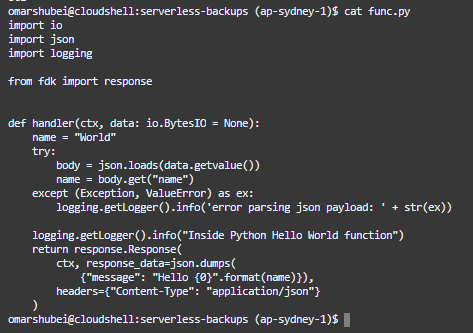
As shown in the following screenshot, this command will create a "hello-world" Python 3.8 Docker base image for a function called serverless-backups, requirements.txt file for packages and yaml config file.


The second step is to add the Python code for my function, and add OCI package in requirements.txt (By default, oci is not included in the image and we need this particular package to access vaults APIs).

The standard image is pre-configured with hello-world function as follows:


Using vim editor, I will update the code with my new Python function.


Here is the code in snippet format:

 1
 2
 3
 4
 5
 6
 7
 8
 9
10
11
12
13
14
15
16
17
18
19
20
21
22
23
24
25
26
27
28
29
30
31
32
33
34
35
36
37
38
39
40
41
42
43
44
45
46
47
import io
import json
import logging
import oci
import http.client
import base64


from fdk import response
from datetime import datetime


#Get secret content function in base64
def get_secret_base64(secret_id):
    signer = oci.auth.signers.get_resource_principals_signer()
    try:
        client = oci.secrets.SecretsClient({}, signer=signer)
        secret_content = client.get_secret_bundle(secret_id).data.secret_bundle_content.content
    except Exception as ex:
        print("Error getting secret contents", ex, flush=True)
        raise
    return  secret_content
#Main function
def handler(ctx, data: io.BytesIO = None):
    cfg = ctx.Config()
    epmURL = cfg["epmURL"]
    osURL = cfg["osURL"]
    sec1_ocid = cfg["epm_secret"]
    sec2_ocid = cfg["token_secret"]
    #Get EPM credentials and auth toen for object storage
    epm_login_secret = get_secret_base64(sec1_ocid)
    object_storage_token = get_secret_base64(sec2_ocid)
    #Backup details
    backup_time = datetime.now().strftime("%Y_%m_%d-%I:%M:%S_%p")
    os_pwd = base64.b64decode(object_storage_token.encode('utf-8')).decode('utf-8')
    os_url = osURL+backup_time+".zip"
    os_user = "epm_cloud_test_user"
    os_snapshot = "Artifact Snapshot"
    conn = http.client.HTTPSConnection(epmURL)
    payload = "url="+os_url+"&username="+os_user+"&password="+os_pwd+"&filepath="+os_snapshot
    headers = {
                        'Content-Type': 'application/x-www-form-urlencoded',
                         'Authorization': 'Basic {}'.format(epm_login_secret)
                  }
    conn.request("POST", "/interop/rest/v1/services/copytoobjectstore", payload, headers)
    data = conn.getresponse().read()
    return response.Response(ctx, response_data=data)

get_secret_base64 is a function that will return the content of Vault secrets in Base64 (here is an excellent blog by the A-Team on working with vaults in Python).

Handler section is considered the main function and is the entry point for the function (similar to Java's public static void main(string args)).

The following section is where I'm calling the get_secret_base64 function and passing the secrets' OCID to get the EPM credentials and Object Storage tokens contents in base64. (OCID and URL information is stored in configuration key pairs defined at the function level)

1
2
3
4
5
6
7
8
    cfg = ctx.Config(
    epmURL = cfg["epmURL"]
    osURL = cfg["osURL"]
    sec1_ocid = cfg["epm_secret"]
    sec2_ocid = cfg["token_secret"]
    #Get EPM credentials and auth toen for object storage
    epm_login_secret = get_secret_base64(sec1_ocid)
    object_storage_token = get_secret_base64(sec2_ocid))


In the next line, I'm decoding the authentication password for Object Storage to plaintext so I can use in CopyToObjectStorage REST API.

os_pwd = base64.b64decode(object_storage_token.encode('utf-8')).decode('utf-8')

Finally, I'm calling EPM Cloud's CopyToObjectStorage API to copy the Artifact Snapshot backup file to an Object Storage bucket called serverless-backups.

 1
 2
 3
 4
 5
 6
 7
 8
 9
10
11
12
13
14
    backup_time = datetime.now().strftime("%Y_%m_%d-%I:%M:%S_%p")
    os_pwd = base64.b64decode(object_storage_token.encode('utf-8')).decode('utf-8')
    os_url = osURL+backup_time+".zip"
    os_user = "epm_cloud_test_user"
    os_snapshot = "Artifact Snapshot"
    conn = http.client.HTTPSConnection(epmURL)
    payload = "url="+os_url+"&username="+os_user+"&password="+os_pwd+"&filepath="+os_snapshot
    headers = {
                        'Content-Type': 'application/x-www-form-urlencoded',
                         'Authorization': 'Basic {}'.format(epm_login_secret)
                  }
    conn.request("POST", "/interop/rest/v1/services/copytoobjectstore", payload, headers)
    data = conn.getresponse().read()
    return response.Response(ctx, response_data=data)


Now it is time to deploy the function to the registry using the following command.

fn deploy --app serverless-backups


Once complete, you will "Successfully created function:...." as shown here.


To list the Docker images, I can run "Docker images".


Now we have the function deployed, we can review the image details that has been pushed using OCI CLI or by using Console. For example, here is the registry I just deployed the function to:


The deployed function (notice the invoke endpoint which will be used to invoke the function using raw-request CLI command next).


Last but not least, let us invoke this function using two methods: "fn invoke" and oci's "raw-request" cli command.

In Cloud Shell, invoke the fn function using the following command

fn invoke serverless-backups serverless-backups

Notice the function ran successfully and returned a JSON response.


I can verify a new backup has been copied to the bucket.


I can also invoke the function using raw-request cli command as follows (you need the invoke endpoint for the function which is shown in the previous function screenshot):

oci raw-request --http-method POST --target-uri


Another backup file has been copied to the bucket.


That is it for this post, I've just demonstrated how to build a serverless function that copies the latest EPM Cloud backup file to an object storage bucket in OCI using Oracle Functions.

In subsequent posts, I will expand on this and go through other ways we can invoke functions using Events, Alarms and OIC to further demonstrate how "serverless" functions can be embedded and used in the overall OCI ecosystem.

Thank you for reading.


Sunday, September 5, 2021

Quick tip - Deploying Essbase 21c in Oracle Cloud Infrastructure

This post is about some tips on how to successfully deploy Essbase 21c marketplace offering in OCI. 

Thanks to OCI's Resource Manager, this task is straight-forward and is not time-consuming. That said, it is easy to miss a single step and ending up spending hours troubleshooting an issue you shouldn't have in the first place.
The pre-deployment configuration steps are as follows:

  1. Create compartment 
  2. Create a vault, encryption key, create secrets for your admin passwords and note down the OCID.
  3. Decide on your database option for RCU schemas (you can use an existing database or create a new database as part of the stack deployment)
  4. Create dynamic groups and policies
  5. Configure IDCS if needed (in this case, I'm using embedded LDAP since it is a Dev environment. For Production environments, you need to configure IDCS application and users)
I'm not going to cover each step in detail but rather focus on the task that got me in trouble the first time I tried to deploy Essbase which is dynamic groups and policies. The lazy side of decided to assume the tenancy compartment level defined policies are going to be sufficient for the deployment since I'm using a user with full OCI administration privileges. 

Here is the what I have defined for the first time:


Notice I just have one policy statement:

ALLOW GROUP Admninistrators to manage all-reources in comaprtment Essbase-Dev2


The policy looked sufficient to me, it basically means any user in Administrators group can manage all resources in Essbase-Dev2 compartment, so let me proceed with the deployment and see how it goes.

Go to Marketplace and search for Essbase - UCM (If you have an existing license, you can select BYOL option)

Next step is to provide the secret OCID for the Essbase admin user.


Next step is to configure the Identity Provider, since this is a dev environment I'm going to use embedded LDAP as my Identity Provider.


Finally, I need to specify the database option, and provide the secret OCID for the database admin user.


Next step is to create and deploy the resource manager stack, and wait for it to finish. This step would take anywhere from 2 to 5 minutes tops, once it is finished you can find the server information in "Application Information tab".

It is important to note that the actual Essbase server-side configuration will take another 10 to 15 minutes to complete. You can check the log status in /var/log/essbase-init.log


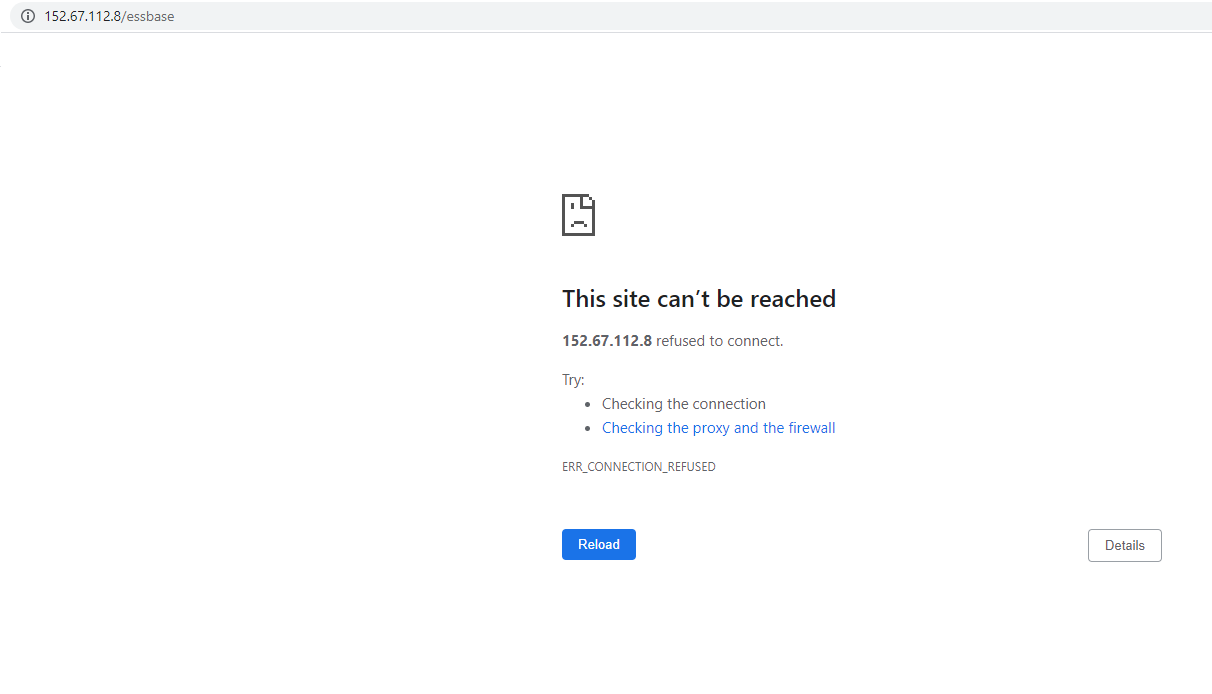
Next step is to launch Essbase and confirm it is up and running and here is when I notice something has gone wrong! After waiting for 20 minutes, I keep getting the site can't be reached so it is obvious that something did not work according to the plan.


To get a better idea, I searched for more information in /var/etc/log and here is what I found

Basically, the status of each and every configuration item is

"The service returned error code 404"

404 error means nothing exists at the given URI, in other words the services the resource manager is trying to configure are not available

The error message is not very helpful if you ask me, so I had to go back and try to find out what exactly went wrong, and I suspected  it might be due to the missing policies that Resource Manager needed in order to deploy the stack. (Remember I didn't create a dynamic group and assign policy at that level). 

It turned out I was right, it took me an hour to figure out, and it was the missing dynamic group and policies that caused this issue. So to fix this, I had to do the following:

  1. Create a dynamic group 
  2. Add "Essbase-Dev2" compartment to the matching rules of the group
  3. Create specific policies as instructed in Essbase deployment documentation
Here is a screenshot of the dynamic group and the matching rule.


And the policies at group level.


All I have to do now is repeat the same deployment steps again, but first I want to terminate the faulty instance and create a new deployment job.


Fast forward 20 minutes and here is the  new /var/log/essbase-init.log which looks much better this time.


This time I managed to confirm the WebLogic servers and services are up and running.


Finally, I confirmed I can access and login to the new environment.


That's it for today, I hope you find this post helpful.